Program 11: The Convolution Operator
Write a program to perform convolution of an image array with a kernel — the worked example from the CBSE AI handbook — and apply an edge-detecting kernel to a photo.
1Aim

Keep photo.jpg in the same folder as the program.
2Program
# Program 11: The convolution operator
# Part 1 works the example from the CBSE AI handbook: a 5 x 5 image array
# and a 3 x 3 kernel. The edges of the image are extended with zeros, so
# the result is the same size as the image.
# Part 2 applies an edge-finding kernel to a real photo.

import numpy as np
import cv2
import matplotlib.pyplot as plt

image = np.array([[17, 24,  1,  8, 15],
                  [23,  5,  7, 14, 16],
                  [ 4,  6, 13, 20, 22],
                  [10, 12, 19, 21,  3],
                  [11, 18, 25,  2,  9]])

# The kernel, already rotated as in the handbook.
kernel = np.array([[2, 9, 4],
                   [7, 5, 3],
                   [6, 1, 8]])

# Extend every edge by one pixel of value 0.
padded = np.pad(image, 1)

result = np.zeros((5, 5), dtype=int)
for r in range(5):
    for c in range(5):
        # The 3 x 3 patch of the image under the kernel, centred on (r, c).
        patch = padded[r:r + 3, c:c + 3]
        # Multiply matching numbers and add all nine products.
        result[r, c] = (patch * kernel).sum()

print("Image array I:")
print(image)
print()
print("Kernel K:")
print(kernel)
print()
print("First value, worked out by hand:")
print("  centre 5 x 17 + right 3 x 24 + below 1 x 23 + below-right 8 x 5")
print("  =", 5 * 17, "+", 3 * 24, "+", 1 * 23, "+", 8 * 5, "=", 5 * 17 + 3 * 24 + 1 * 23 + 8 * 5)
print()
print("Result I * K:")
print(result)
print()

# Check: OpenCV's filter2D slides a kernel the same way.
check = cv2.filter2D(image.astype(np.float32), -1, kernel.astype(np.float32),
                     borderType=cv2.BORDER_CONSTANT)
print("Same answer from OpenCV filter2D :", np.array_equal(result, check.astype(int)))

# Part 2: an edge kernel on the photo.
grey = cv2.imread("photo.jpg", cv2.IMREAD_GRAYSCALE)
edge_kernel = np.array([[-1, -1, -1],
                        [-1,  8, -1],
                        [-1, -1, -1]], dtype=np.float32)
edges = cv2.filter2D(grey.astype(np.float32), -1, edge_kernel)

plt.figure(figsize=(8, 4.5))
plt.subplot(1, 2, 1)
plt.imshow(grey, cmap="gray")
plt.title("Grayscale photo")
plt.axis("off")
plt.subplot(1, 2, 2)
plt.imshow(np.abs(edges), cmap="gray", vmin=0, vmax=120)
plt.title("After the edge kernel")
plt.axis("off")
plt.show()3Output
The output of a real run, exactly as it appeared.
Image array I:
[[17 24  1  8 15]
 [23  5  7 14 16]
 [ 4  6 13 20 22]
 [10 12 19 21  3]
 [11 18 25  2  9]]

Kernel K:
[[2 9 4]
 [7 5 3]
 [6 1 8]]

First value, worked out by hand:
  centre 5 x 17 + right 3 x 24 + below 1 x 23 + below-right 8 x 5
  = 85 + 72 + 23 + 40 = 220

Result I * K:
[[220 441 346 276 231]
 [431 595 410 575 471]
 [371 440 555 620 551]
 [301 585 600 765 421]
 [247 446 536 451 128]]

Same answer from OpenCV filter2D : True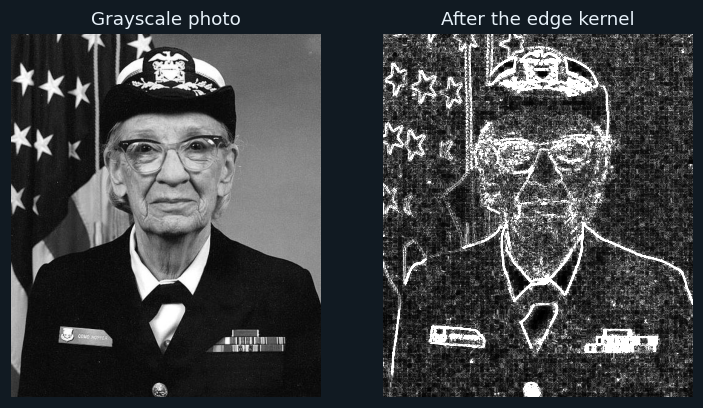
4How it works
np.pad(image, 1)Extends every edge by one pixel of value 0, so the kernel can be centred on the edge pixels and the result stays 5 × 5 — as the handbook describes.
patch = padded[r:r + 3, c:c + 3]The 3 × 3 part of the image under the kernel, centred on position (r, c).
(patch * kernel).sum()Multiplies each of the 9 pixels by the matching kernel number and adds the 9 results — one value of the output.
cv2.filter2D(...)OpenCV's built-in function slides a kernel the same way. The program checks that both answers agree.
edge_kernel−1 all round and 8 in the centre: on a smooth area the values cancel to 0; at an edge they do not, so edges light up.
5Try this
- Work out the second value of the result (441) by hand and check it.
- Use np.ones((3, 3)) / 9 as the kernel on the photo. What does it do?
- Run the convolution without padding. What size is the result?
6Viva questions
▸What is a kernel?
A small matrix of numbers that is slid across an image; at each position, the overlapping values are multiplied and added.
▸Why are the edges padded with zeros?
So the kernel can be centred on the edge pixels and the output image is the same size as the input.
▸What is the first value of the result, and how is it found?
220: 5 × 17 + 3 × 24 + 1 × 23 + 8 × 5, because the other kernel cells lie on the zero padding.